VALORANT Summit Map Guide: Callouts, Best Agents & Strategies
Looking to purchase VALORANT Points for weapon skins, bundles, or the latest Battle Pass? Visit the English Topuplist VALORANT Top Up page, select your supported region, and double-check your Riot ID in the Name#Tag format before completing payment. Package availability and prices may vary by region.
Summit is VALORANT’s newest standard map and one of Riot Games’ most mechanically unusual battlegrounds. Introduced with Patch 13.00, Summit is a two-site, three-lane map set inside a Radiant training academy in the mountains of China.
Its defining feature is a set of three droppable walls. Once activated, each wall closes a route for the rest of the round, permanently changing how attackers enter sites and how defenders rotate.
This Summit map guide explains the full layout, essential callouts, wall mechanics, best early-meta Agents, attacking plans, defensive setups, post-plant strategies, and common mistakes to avoid.
Riot has already added Summit to the Competitive map rotation, so learning the map early can give you a significant advantage in ranked matches. You can review its current map-pool status in the official VALORANT Patch 13.00 notes.
VALORANT Summit Map Overview
Summit follows a recognizable A–Mid–B structure, but it does not remain static throughout a round. The droppable walls can close key connectors and force players to rethink rotations, retakes, and post-plant positions.
According to Riot’s official VALORANT maps page, Summit is designed around large walls that can change the battlefield layout for an entire round.
The most important strategic principles are:
Control Mid before committing to a site.
Track which walls are still open.
Communicate before activating a wall.
Maintain control of B Tower and its vertical routes.
Choose plant positions based on the remaining rotation paths.
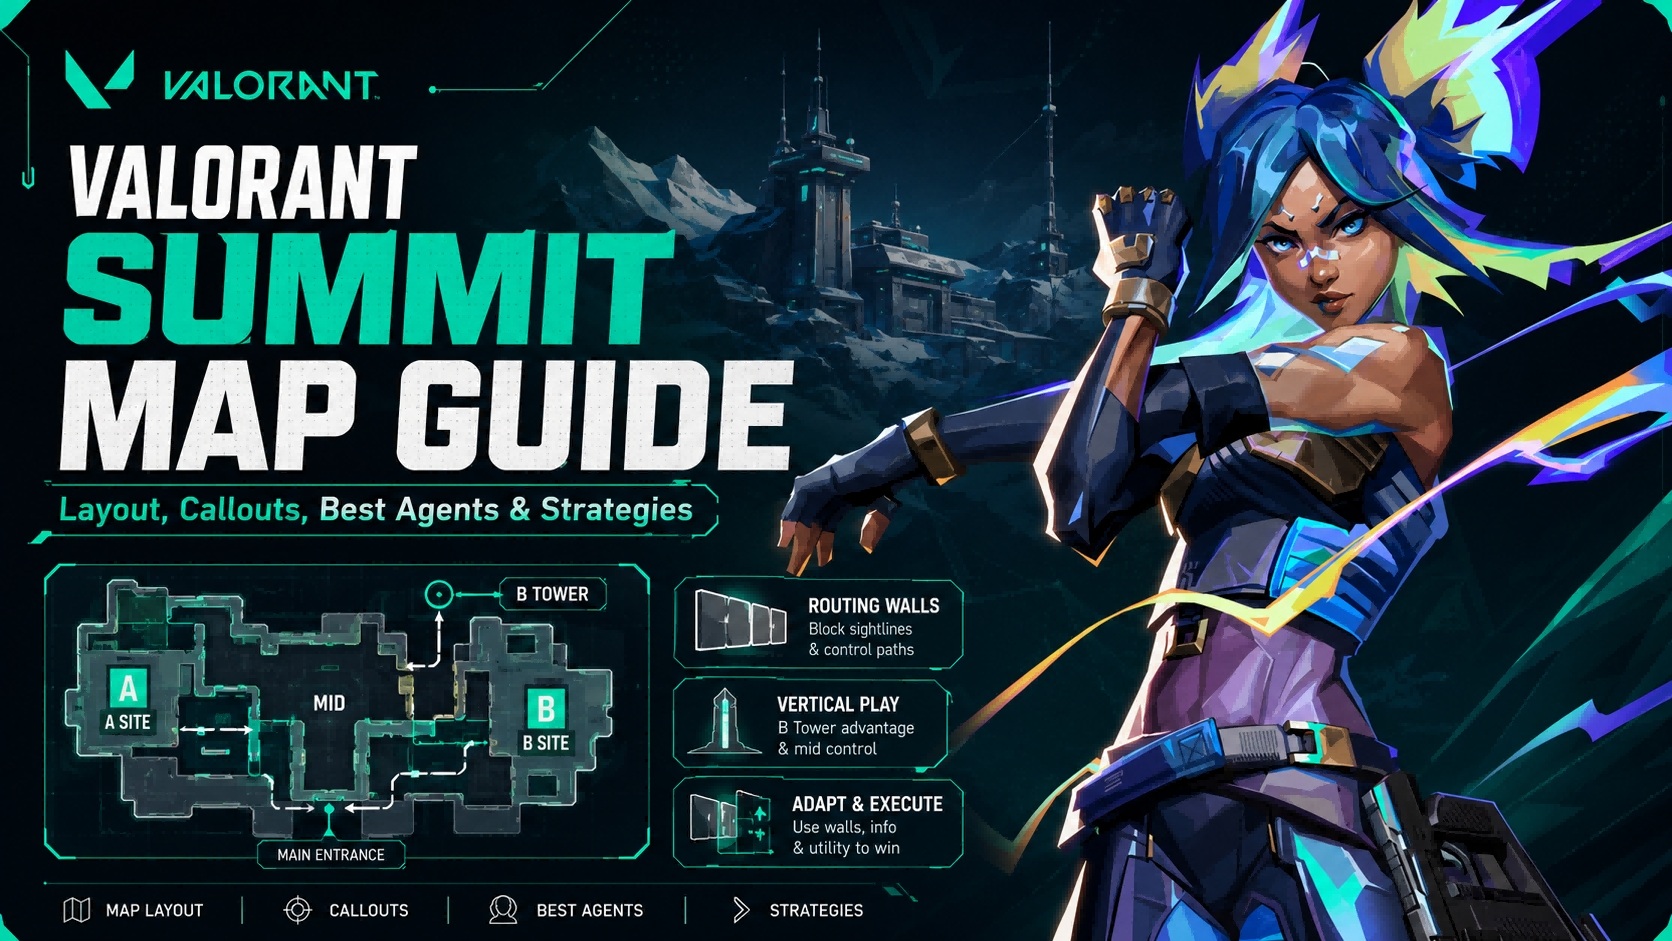
Summit Map Layout Explained
Summit has three main lanes: A, Mid, and B.
Unlike maps where Mid is only an optional route, Summit’s central lane strongly affects access to both sites. A team that controls Mid can create split attacks, catch rotating defenders, and pressure multiple wall switches.
A-Side Layout
The main A-side callouts are:
A Lobby
A Main
A Cave
A Art
A Garden
A Hall
A Link
A Site
A Lobby and A Main form the primary attacking approach. Attackers should expect defensive utility, early information abilities, and close-angle fights before reaching the site.
A Art and A Garden are especially important because one of Summit’s droppable walls separates these areas. Closing this route can protect a site take, but it can also remove an important rotation or post-plant escape path.
A Hall and A Link help connect the site to the rest of the defensive side. Attackers who take these areas can make retakes significantly harder.
Mid Layout
The primary Mid callouts are:
Mid Fountain
Mid Tiles
Mid Bend
Mid Bottom
Mid Window
Mid Top
Mid is likely to become one of Summit’s most contested areas. It provides information, access to split attacks, and opportunities to cut rotations.
Mid Window is a dangerous elevated position that can support long-range fights. Mid Bottom and Mid Fountain are more exposed, making flashes, reconnaissance, and smokes especially valuable.
The Mid droppable wall sits between Mid Window and Mid Bottom. Once it falls, it changes the normal connection between the upper and lower sections of Mid.
Teams should avoid activating it automatically. Closing Mid may protect one area while giving the enemy safer control of another.
B-Side Layout
The main B-side callouts are:
B Lobby
B Main
B Trophy
B Link
B Site
B Tower
B Gym
B Drop
B Site contains more vertical gameplay than A. B Tower overlooks important parts of the site, while B Gym connects to Tower through a rope ascender.
B Tower also has access to B Drop through Summit’s silent-drop mechanic. Players who use the correct landing area can descend with less audio, creating unexpected retake, flank, or repositioning opportunities.
Because B Tower offers elevation and multiple movement options, teams should rarely execute onto B without clearing or isolating it first.
Summit Callouts You Need to Learn
Clear communication is especially important on Summit because the map can physically change during a round.
Essential A-Side Callouts
A Lobby
The initial staging area for an A-side attack. Teams can hold here while gathering information or preparing utility.
A Main
The primary entrance toward A Site. Expect defensive slows, traps, smokes, and early Operator angles.
A Cave
A tighter position that should be cleared with utility rather than ignored during a fast execute.
A Art
A strategically important side area near the A droppable wall.
A Garden
A key defensive and post-plant area connected to the A wall mechanic.
A Hall and A Link
Rotation spaces that attackers may try to secure after entering the site.
A Site
The plant area. The safest plant position depends on whether the A wall remains open and which post-plant areas the attackers control.
Essential Mid Callouts
Mid Fountain
An attacker-side Mid position that can become an early utility battleground.
Mid Tiles
A transition space where players should be ready for crossfires and aggressive peeks.
Mid Bend
A curved or angled section that can hide close-range defenders.
Mid Bottom
The lower central area near the Mid wall.
Mid Window
An elevated position that can create strong defensive sightlines.
Mid Top
An upper Mid section useful for controlling rotations and setting up site splits.
Essential B-Side Callouts
B Lobby and B Main
The primary attacker-side approach to B.
B Trophy
An important transition area that should be cleared before committing to the site.
B Link
A defender rotation route connecting B to central areas.
B Site
The Spike plant zone and the center of most B executes.
B Tower
An elevated control position that can overlook the site and enable silent-drop plays.
B Gym
The lower area connected to B Tower through the ascender.
B Drop
The landing area beneath Tower. Players should always consider a possible silent flank from this direction.
How Summit’s Droppable Walls Work
Summit contains three droppable walls:
Each wall is connected to a destructible switch. Once the switch is destroyed, the wall begins to descend and remains closed for the rest of the round.
The wall cannot be raised again.
Players and deployed utility caught beneath a descending wall may be destroyed, so teams must communicate before activating one. A small opening remains near the top, allowing certain sightlines and abilities to pass through.
Best Attacker Uses
Attackers can use the walls to:
Block defender rotation routes.
Separate a site anchor from retaking teammates.
Protect a planted Spike.
Force defenders through one predictable entrance.
Isolate B Tower from B Site.
Create a fake by changing the map before rotating.
Deny an Operator’s normal retreat route.
The strongest use is usually after gaining space rather than at the beginning of a round.
For example, closing the B wall after taking B Site may prevent a Tower player from immediately assisting the retake. However, activating it too early could also stop attackers from using Tower themselves.
Best Defender Uses
Defenders can use the walls to:
Close a route after gathering information.
Delay a split attack.
Funnel attackers into Sentinel utility.
Protect a weakly defended section of the map.
Separate the Spike carrier from the entry players.
Force attackers to rotate through a longer path.
Preserve site control after falling back.
Defenders should avoid dropping walls simply because enemies have appeared. Waiting several seconds may allow the team to confirm the Spike location or trap more attackers on the wrong side.
Risks of Dropping a Wall Too Early
Poor wall timing can lose a round.
Common problems include:
Blocking your own rotation.
Trapping a teammate outside the site.
Giving attackers an easier post-plant.
Removing a safe escape path.
Revealing that a site has limited defenders.
Closing Mid while the enemy already controls the better side.
Preventing utility from reaching the site.
Before activating a wall, call out its location and confirm that teammates are clear.
B Tower, Ascender, and Silent Drop
B Tower is one of Summit’s most important positions.
The ascender connects B Gym to B Tower, allowing players to quickly move between the lower and upper levels. However, using the rope may reveal your position through audio.
Before climbing:
Clear the Tower entrance with utility.
Ask a teammate to cover the top.
Avoid climbing while multiple enemies can swing together.
Consider using a flash, stun, smoke, or recon ability first.
The silent-drop area allows players to descend from B Tower toward B Drop with reduced landing noise. The drop is only reliable when the player lands correctly and avoids moving too aggressively.
This creates several possibilities:
A defender can quietly reposition during a retake.
An attacker can change post-plant elevation.
A lurker can surprise players watching the ascender.
A player can escape Tower without using the predictable rope route.
Teams attacking B should assign someone to watch Tower and Drop, particularly after the Spike is planted.
Best Agents for Summit
Because Summit is new, its professional meta is still developing. The following recommendations are based on its three-lane structure, vertical B area, narrow entrances, and permanent wall mechanic.
Best Duelists
Jett
Jett is a strong early choice for Summit because she can challenge long sightlines and escape after taking an opening duel.
Her Updraft can help contest elevated B positions, while Cloudburst allows her to cross exposed lanes. Tailwind is valuable when entering narrow sites where the first player is likely to face multiple angles.
Jett is especially effective for teams that want to contest Mid or use an Operator on defense.
Raze
Raze is better suited to clearing Summit’s tighter spaces.
Paint Shells can punish defenders hiding near entrances or wall switches. Boom Bot provides useful information in areas where attackers would otherwise need to expose themselves.
Blast Packs also give Raze enough mobility to pressure B Tower and quickly enter sites.
Neon
Neon is a viable alternative for teams that value speed.
Summit’s three-lane layout creates frequent rotations, and Neon can exploit a defensive gap before the enemy adjusts. Her stun is also effective in narrow corridors and site entrances.
Best Initiators
Sova
Sova provides reliable information across large sections of Summit.
Recon Bolt can reveal defenders on sites or in Mid, while Owl Drone helps clear difficult angles before an execute. His Shock Bolts may also pressure defenders near wall switches or delay Spike interactions.
Patch 13.00 reduced the signature cooldown of several Initiators, including Sova, which improves their late-round utility cycle. Full balance details are available in Riot’s Patch 13.00 notes.
Breach
Breach is built for long corridors and narrow choke points.
Fault Line can disrupt defenders holding site entrances, while Flashpoint helps teammates enter without dry-peeking. Aftershock is useful for clearing predictable corners and forcing enemies away from strong positions.
Rolling Thunder can cover large portions of a site during an execute or retake.
Fade
Fade is a strong option for close and medium-range clearing.
Prowlers can check corners around A Main, B Main, and connectors. Haunt provides fast information, while Seize combines well with Raze grenades, molotovs, and other damage abilities.
KAY/O
KAY/O can suppress Sentinel setups and reduce the defensive value of stacked utility.
ZERO/POINT is useful for early information, while his flashes support coordinated site entries. He is especially valuable against teams relying heavily on Killjoy, Cypher, or Deadlock.
Best Controllers
Omen
Omen is likely to be one of Summit’s most flexible Controllers.
His rechargeable smokes allow teams to adapt when a wall changes the map. Paranoia works well through narrow lanes, and Shrouded Step can create unusual vertical positions.
However, Patch 13.00 also adjusted enemy audio clarity for Shrouded Step, so opponents may hear obvious teleports more consistently.
Viper
Viper offers strong site control and post-plant pressure.
Toxic Screen can divide a site or block multiple sightlines, while Snake Bite delays pushes and defuses. She may work best as a secondary Controller rather than the only smoker, depending on the team’s execute style.
Astra
Astra is most effective in coordinated teams.
Her global utility lets her influence A, Mid, and B without rotating immediately. Gravity Well can punish players near switches, entrances, or the planted Spike.
Best Sentinels
Killjoy
Killjoy is an excellent site anchor on Summit.
Her Turret can watch a long approach or protect a flank, while Alarmbot provides information when walls force players onto alternative routes. Nanoswarms remain valuable for plant denial and post-plant setups.
Patch 13.00 increased Turret fire rate, Nanoswarm duration, and Alarmbot movement speed, strengthening her current defensive utility.
Cypher
Cypher is particularly useful because Summit’s available routes can change during a round.
Trapwires can watch flanks and narrow connectors, while Spycam provides information without risking a player. Cyber Cages can help Cypher survive after taking contact or delay a site entry.
Deadlock
Deadlock can punish attackers forced through restricted entrances.
Barrier Mesh can reshape a route even further when combined with a dropped wall. GravNet and Sonic Sensor are effective when enemies must move quickly through predictable spaces.
Sage
Sage can use Barrier Orb to create another temporary obstruction on a map already defined by route control.
Slow Orbs are effective in narrow approaches, and her healing supports repeated Mid fights. Creative walls may also generate unexpected elevated angles.
Recommended Summit Team Compositions
A balanced early-meta composition could be:
Jett, Sova, Breach, Omen, and Killjoy
This lineup provides:
Opening duel potential.
Two sources of information and entry support.
Flexible smokes.
Strong site anchoring.
Reliable flank protection.
A post-plant-focused lineup could use:
Raze, Sova, Omen, Viper, and Killjoy
This composition sacrifices some initiation flexibility for stronger area denial and Spike control.
For less coordinated ranked teams, a practical lineup is:
Jett, Raze, Fade, Omen, and Cypher
It gives players more self-sufficient utility and does not require perfect timing to create space.
Best Attacking Strategies on Summit
Begin With a Default
A default setup helps identify defender positions and wall status before committing.
A simple structure is:
One player pressures A.
Two players contest or watch Mid.
One player pressures B.
One player carries the Spike and supports the safest lane.
The goal is not to immediately find kills. Instead, try to force defensive utility, identify aggressive players, and learn which routes the defenders are willing to close.
Prioritize Mid Control
Mid control creates access to both sites and makes defensive rotations less comfortable.
Use recon, flashes, drones, or smokes before entering. Do not repeatedly dry-peek Mid Window or other elevated angles.
Once Mid is secured, attackers can:
Split A through Mid and A Main.
Split B through Mid and B Main.
Hold rotations while the rest of the team executes.
Force defenders to activate the Mid wall.
Fake pressure before rotating.
A-Site Execute
A basic A execute should follow this order:
Clear A Main and nearby close corners.
Use reconnaissance utility to reveal site defenders.
Smoke defensive sightlines and rotation entrances.
Flash or stun through the main choke point.
Secure A Art or A Garden before planting.
Plant for the positions the team actually controls.
Drop the A wall only after teammates are safely positioned.
Do not activate the A wall before deciding where the post-plant players will stand.
B-Site Execute
A standard B execute should focus on Tower control:
Clear B Main and B Trophy.
Recon, flash, or smoke B Tower.
Isolate defender rotation entrances.
Send the Duelist onto the site.
Secure Tower, Drop, or the nearest connector.
Plant for multiple post-plant angles.
Consider closing the B wall to isolate retakers.
Ignoring B Tower allows defenders to maintain vertical pressure throughout the execute.
Fake Executions
Summit’s walls make fakes more convincing.
A team can show utility on one site, activate a wall, and then rotate before defenders understand the new route structure.
However, the fake must have a clear purpose. Do not close a wall that makes the final execute more difficult.
Best Defensive Strategies on Summit
Do Not Surrender Mid for Free
Attackers with uncontested Mid control can create too many split options.
Defenders do not need to fight to the death for Mid, but they should gather information and force attackers to use utility.
Effective tools include:
Sova recon utility.
Cypher cameras and wires.
Killjoy Turret.
Omen smokes.
Breach stuns.
Operator pressure.
After taking contact, defenders should have a planned fallback route.
Defending A Site
A defenders should focus on:
Gathering early A Main information.
Preserving escape utility.
Creating a crossfire between site and connector areas.
Delaying the plant rather than taking unnecessary fights.
Communicating before dropping the A wall.
If attackers gain A Art and A Garden, defenders may need to wait for teammates instead of attempting isolated duels.
Defending B Site
B defense revolves around Tower control and vertical awareness.
The Tower player should avoid becoming trapped without support. Site defenders should also watch for attackers using smokes to isolate Tower before entering.
Save at least one piece of utility for the final site hit. Using every grenade, trap, or smoke in the opening seconds leaves the site vulnerable later.
Retaking After a Wall Drops
Before beginning a retake, confirm:
Which wall is closed.
Which entrances remain available.
Whether the Spike is planted for long-range or close-range positions.
Whether B Tower or Drop is controlled.
Which teammate has initiation utility.
Do not send every defender through the same entrance. Use flashes and reconnaissance before committing, especially when the wall has funneled the team into a predictable path.
Summit Post-Plant Strategies
The best plant position depends on the wall status.
Before planting, ask:
Which areas does the team control?
Can defenders reach the Spike from Tower or a connector?
Is the nearby wall open?
Does the team have molotovs or delay utility?
Are post-plant players using long-range or close-range weapons?
After a wall falls, attackers should not stack everyone on the same side. One player should watch the remaining rotation path, while another protects against flanks or vertical repositioning.
On B, always consider a possible silent drop from Tower.
Best Weapons on Summit
The Vandal and Phantom remain the most reliable all-purpose weapons because Summit mixes long Mid fights with close site entrances.
The Operator should be effective around:
Long Mid sightlines.
Defensive opening angles.
B Tower.
Site entrances with a safe escape route.
Shotguns and SMGs can work around:
B Tower and B Drop.
Tight connectors.
A Cave.
Closed-wall positions.
Eco-round ambushes.
Players should adapt their positioning to their weapon rather than forcing a Spectre or Judge into long-range Mid fights.
Common Summit Mistakes
The most frequent mistakes are likely to include:
Activating a wall without warning teammates.
Closing a rotation before locating the Spike.
Ignoring Mid control.
Dry-peeking elevated positions.
Entering B without clearing Tower.
Forgetting the silent drop.
Planting without considering wall status.
Using all defensive utility too early.
Rotating through the same predictable route.
Treating Summit like a completely static map.
Summit Tips for Solo Queue
Solo queue teams may not have coordinated wall setups, so communication should be simple.
Useful callouts include:
“A wall still open.”
“Mid wall dropping.”
“One B Tower.”
“Watch silent drop.”
“Spike rotating Mid.”
“Do not close the wall yet.”
Ping the intended plant location and announce wall activations before shooting the switch.
Agents with self-sufficient utility, such as Omen, Jett, Raze, Cypher, or Fade, may be easier to use when teammates are not coordinating complex executes.
Frequently Asked Questions
Is Summit in the VALORANT Competitive map pool?
Yes. Riot added Summit to the Competitive map rotation with Patch 13.00. Map pools can change in future updates, so check the latest official patch notes before publishing or updating this guide.
How many sites does Summit have?
Summit has two Spike sites: A and B.
How many lanes does Summit have?
Summit uses a three-lane structure consisting of A, Mid, and B.
How many droppable walls are on Summit?
There are three: one on A, one in Mid, and one on B.
Can Summit’s walls be reopened?
No. Once a wall descends, it remains closed for the rest of that round.
Can players be killed by a descending wall?
Yes. Players should move away from the wall before the activation sequence finishes.
What are the best Agents for Summit?
Strong early options include Jett, Raze, Sova, Breach, Omen, Killjoy, Cypher, and Viper. The final meta may change as ranked data and professional strategies develop.
Is Summit attacker-sided or defender-sided?
It is too early to make a definitive judgment. Attackers can use walls to strengthen post-plants, while defenders can use them to restrict splits and funnel pushes.
What is the most important part of Summit?
Mid is one of the most strategically important areas because it supports split attacks and rotation control. However, B Tower and wall timing can be equally decisive in individual rounds.
Final Thoughts
Summit rewards teams that communicate and adapt.
Learning the callouts is only the first step. Players must also track which walls remain open, understand how B Tower changes vertical fights, and select plant positions based on the available rotation routes.
The fastest way to improve on Summit is to:
Learn the official callouts.
Practice Mid-control utility.
Clear B Tower during every B execute.
Announce wall activations.
Plan the post-plant before closing a route.
Summit is not just a new map with another environmental gimmick. Its droppable walls directly affect rotations, executes, retakes, and team composition decisions. Teams that treat each wall as a strategic resource will have a major advantage over players who activate them without a plan.