


SD Gundam G Generation ETERNAL Hidden Stage Guide: Musha Castle, the Musha Ghost & the Demon Blade "Dōtanuki"
How to unlock and clear the Musha Castle hidden stage in SD Gundam G Generation ETERNAL: unlock requirement, enemy roster, recommended lineup, turn-by-turn strategy, the Nemo cheese route, and where to equip the Demon Blade Dōtanuki.
Prepare for the SD Gundam Gaiden Hidden Stage with Topuplist — Before you push into the new SD Gundam Gaiden Chapter 3 content, make sure your roster is ready. You can top up Diamonds, G Diamonds, and limited-edition packs on the Topuplist SD Gundam G Generation ETERNAL top-up page — a fast and secure way to refill premium currency, limit-break your best units, and pull the UR Mobile Suits you need for high-difficulty clears. Just enter your in-game bound Bandai Namco ID email and server, and your Diamonds usually arrive within minutes. For everything else, check out the Topuplist official site.
The SD Gundam Gaiden storyline just expanded with Chapter 3, and with it came a brand-new hidden stage that many commanders have already missed. Tucked away on a small island west of the starting town of Chapter 2, the Musha Castle hidden stage hides one of the toughest solo fights in the current content — and a unique reward: the Musha Ghost's weapon, the Demon Blade "Dōtanuki".
This guide covers everything you need to know, straight from the current in-game update: how the hidden stage unlocks, who you will fight, the recommended lineup and positioning, a turn-by-turn clear strategy, the community's favorite "cheese" route, and what to do with the Dōtanuki once you clear it.
Latest status: The hidden stage went live together with the SD Gundam Gaiden Chapter 3 story update. The unlock requirement is the rare boss "The·O Lanti" in EXPERT difficulty during the Chapter 3 boss battle. Everything below reflects the live version of this stage as of the August 2026 update.
 SD Gundam G Generation ETERNAL


SD Gundam G Generation ETERNAL Hidden Stage Quick Overview
Question | Current Answer |
How do I unlock the hidden stage? | Beat the rare boss "The·O Lanti" in EXPERT difficulty in the Chapter 3 boss battle |
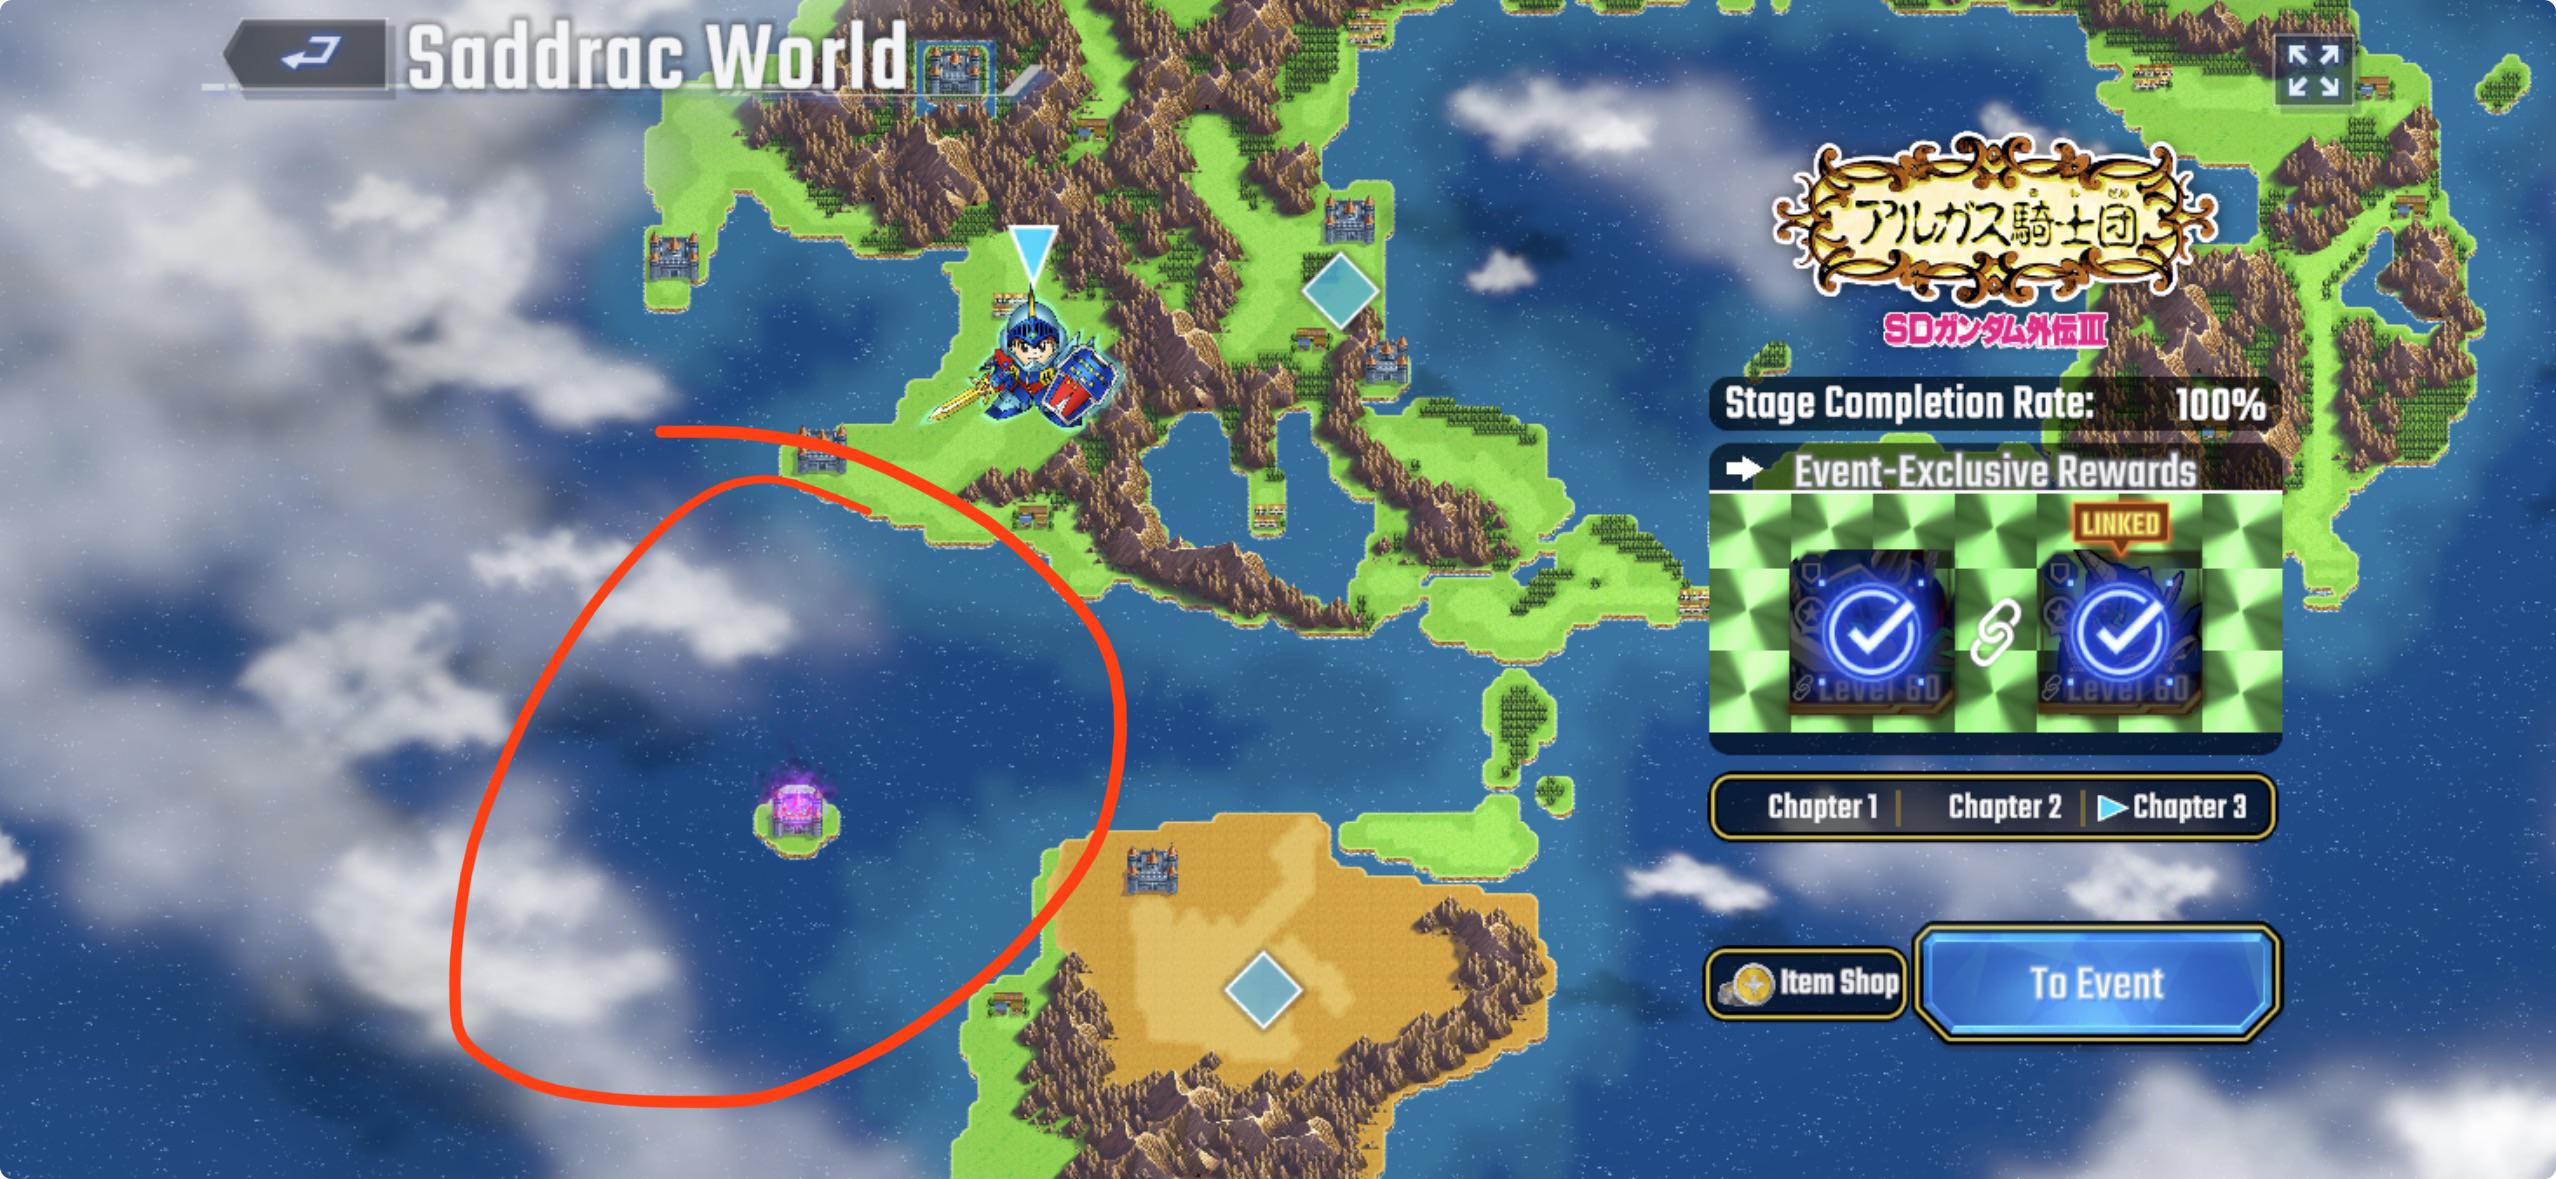
Where is the hidden stage? | Musha Castle, on a small island west of the starting town of Chapter 2 (the "Stone City") |
Who is the boss? | Musha Ghost — heals to 100% once and takes 100% reduced damage from attacks launched from 4+ tiles away |
Who are the adds? | Knight Galbaldy β, Warrior Rick Dom II, and Swordsman Gelgoog — all revive with 50% HP when their HP hits zero |
Team restriction? | SD Gundam tag units only; Squad 1 Slot 1 must be Knight Gundam |
Key reward | The Musha Ghost's weapon — Demon Blade "Dōtanuki" |
When Does the Musha Castle Hidden Stage Unlock?
How to Unlock the Hidden Stage
The hidden stage is not part of the visible map. You unlock it by completing a specific objective inside the Chapter 3 boss battle: you must clear the rare boss "The·O Lanti" at EXPERT difficulty. Until you defeat this rare variant of the Chapter 3 boss, the Musha Castle stage will not appear.
Once unlocked, the stage entrance is easy to miss. It sits on a small island to the west of the starting town of Chapter 2 — the "Stone City" — where the Musha Castle is located. The island has almost no visual markers other than a faint, unsettling aura, so many players walk right past it without ever noticing a stage exists there. If you are looking for it, head to the small island west of the Chapter 2 starting town and check for the Musha Castle entry point.
What Is the Rare Boss "The·O Lanti"?
"The·O Lanti" is the rare spawn variant of the Chapter 3 boss fight. In SD Gundam G Generation ETERNAL, boss battles occasionally feature rarer, stronger versions of a stage boss, and "The·O Lanti" is this chapter's rare encounter at EXPERT difficulty. It is not the hidden stage's own boss — clearing it is simply the key that unlocks the hidden stage.
Hidden Stage Enemy Roster: Know Your Foes
The stage opens with only four enemies, but every one of them carries a nasty gimmick. Understanding each ability before you commit to a formation is half the battle.
Enemy | Key Ability | How to Handle It |
Musha Ghost (boss) | Restores 100% HP once; takes 100% reduced damage from attacks launched from 4+ tiles | Strip the adds first, then move in close and pile on melee/mid-range damage; never rely on long-range sniping |
Knight Galbaldy β (add) | Attacks damage your EN | Clear it early so your skill/EN pool stays healthy |
Warrior Rick Dom II (add) | 2 Support Defense uses + 1 unconditional extra action | Focus it before it can shield the boss or take bonus actions |
Swordsman Gelgoog (add) | Weapon applies -4 Movement (permanent) to your units; has a firepower vacuum at range 2 | Highest threat — attack from the range-2 safe zone so it cannot counterattack |
The Boss: Musha Ghost
The Musha Ghost is the hidden stage boss. It is dangerous for two specific reasons. First, it can restore its HP to 100% once during the fight, so you need enough sustained damage to chew through two full health bars. Second, it takes 100% reduced damage from attacks launched from 4 or more tiles away — in practice, that means long-range sniping is wasted on it. You have to close the distance and fight it at close-to-mid range.
That said, the Musha Ghost is much weaker once its three retainers are gone. The boss's real threat level comes from the supporting cast, not from itself. Clear the adds first and the boss becomes a straightforward damage check.
The Three Retainers
All three adds share the same revive mechanic: when their HP hits zero, they recover 50% of their HP instead of being defeated. Plan around needing to "kill" each of them twice.
Knight Galbaldy β can attack to damage your EN, which quietly cripples your ability to use stronger weapons and MAP skills as the fight drags on.
Warrior Rick Dom II brings 2 Support Defense uses plus 1 unconditional extra action, making it a mobile shield that can also take bonus turns.
Swordsman Gelgoog is the scariest of the three: its weapon applies a permanent -4 Movement debuff to whatever it hits. Losing mobility on a map like this can lock you out of position for the entire fight.
Turn 2 Reinforcement Wave
If you fail to end the battle on turn 1, the stage throws in more enemies at the start of turn 2: 2× Knight Galbaldy β, 2× Warrior Rick Dom II, and 1× Swordsman Gelgoog — five extra units on top of whatever survives. This is the stage's pressure valve: finish fast, or fight an entire second wave. This is also the mechanic that makes the "cheese" route below so popular.
Recommended Team & Positioning
Squad Restriction: SD Gundam Only
Before anything else, check your two squads: the stage only allows units with the "SD Gundam" tag, and Squad 1's Slot 1 must be Knight Gundam. There is no workaround for either rule, so build your lineup around your strongest SD Gundam-tagged units and make sure Knight Gundam is locked into that first slot.
Recommended Lineup
Slot | Recommended Unit | Role |
Squad 1 · Slot 1 | Knight Gundam (required) | Fixed slot — frontline SD Gundam anchor |
Squad 1 · Slots 2 & 4 | Support Attack units | Follow-up damage to finish off revived adds |
Squad 2 · Slot 1 | Giant Psycho Golem | MVP — opens with the "Groundwork" MAP weapon |
Squad 2 · Slots 2 & 3 | Support Attack units | Extra follow-up firepower and wave coverage |
Why This Positioning Works
The lineup is built around one opening: put the Giant Psycho Golem in Squad 2's Slot 1, then stack Support Attack units in Squad 1's Slots 2 and 4 plus Squad 2's Slots 2 and 3. This formation is designed to maximize follow-up support fire after the opening MAP strike, so the three retainers — each with their 50% HP revive — can be cleaned up in a single turn instead of being re-killed across multiple rounds.
Step-by-Step Clear Strategy
Turn 1: Wipe the Retainers with "Groundwork"
The entire stage can be solved in one opening sequence. Use the Giant Psycho Golem's MAP weapon "Groundwork" as your very first action. The MAP area covers all three retainers at once and breaks them in a single strike. It is a brutal opener — all three adds collapse in one shot.
From there, use your Support Attack units to finish off each retainer one by one. Remember the revive mechanic: each add comes back at 50% HP, so every retainer needs a second hit from your follow-up firepower. Because your Support Attack units are already positioned in the recommended slots, the follow-up damage chains naturally into the kills.
Dealing With the Swordsman Gelgoog
The Swordsman Gelgoog is the one unit you should treat with respect. Its permanent -4 Movement debuff looks terrifying on paper, but the stage designers left a deliberate gap: it has a firepower vacuum at range 2. If you stand at exactly range 2 and attack it, you will not eat its counterattack. Position your finisher there, take the kill, and never absorb the movement penalty.
Mop Up, Then Focus the Musha Ghost
Once the retainers are down, move everyone in and pile onto the Musha Ghost. Without its support, the boss is genuinely weak — the threat was the adds, not the boss itself. Because the Musha Ghost shrugs off attacks from 4+ tiles away, keep your damage dealers adjacent or at close range and push through both of its HP bars (including the one free 100% heal).
If the Battle Drags to Turn 2
If your firepower is not high enough to end the fight in one turn, the stage spawns its turn-2 reinforcement wave: 2× Knight Galbaldy β, 2× Warrior Rick Dom II, and 1× Swordsman Gelgoog. Do not panic — this is where the cheese route (below) shines, because it bypasses the cleanup entirely.
The Cheese Route: Nemo's "Combo" MAP
There is a much-loved alternate clear used by players who do not want to fight fair: use Martial Artist Nemo's MAP weapon "Combo" to kill the Musha Ghost outright. The trick is execution, and it goes like this:
Your Giant Psycho Golem blocks the lower Warrior Rick Dom II's Support Defense path, so that add cannot shield the target you are about to hit.
Use any Support Attack firepower to trigger the left-side reinforcement Knight Galbaldy β's revive — punch it to zero HP so it pops back at 50% HP and sits in your kill zone.
Walk Martial Artist Nemo next to the boss and finish the Knight Galbaldy β in melee — the kill transfers through "Combo" to take down the Musha Ghost alongside it. Expect about a 90% hit rate on the decisive swing, so be ready for the occasional miss.
It is cheeky, it is not guaranteed, and it completely ignores the turn-2 reinforcement problem when it works. That 90% accuracy means you should still have a real plan for turn 2 if RNG turns against you.
Clear Rewards: The Demon Blade "Dōtanuki"
Clearing the Musha Castle hidden stage grants you the Musha Ghost's weapon: the Demon Blade "Dōtanuki". This is the stage's headline reward and the reason most players bother unlocking the hidden fight at all.
Reward | Source | Notes |
Demon Blade "Dōtanuki" | Musha Ghost (hidden stage boss) | The Musha Ghost's signature weapon — the only way to obtain it |
Who Should Equip Dōtanuki?
The honest answer from the current community consensus: there is no clearly perfect home for it. The weapon performs adequately on several SD Gundam-tagged melee units, but none of them uses it exceptionally well. The most common choice right now is to hand it to the Giant Psycho Golem, because the Golem's own "Trample" attack already hits hard — the extra weapon gives the Golem even more heavy-hit coverage. If you already run the Golem in your lineup, that is the safest place to park the Dōtanuki while you experiment.
Hidden Stage FAQ
How do I unlock the Musha Castle hidden stage in SD Gundam G Generation ETERNAL?
Clear the rare boss "The·O Lanti" at EXPERT difficulty during the Chapter 3 boss battle. Once you do, the hidden stage appears at Musha Castle, on a small island west of the Chapter 2 starting town (the "Stone City").
Where exactly is the hidden stage located?
On a small island to the west of the "Stone City" (the starting town of Chapter 2). The island has almost no visual markers beyond a faint dark aura, so zoom in and look carefully around that island.
Why does my first slot have to be Knight Gundam?
The stage enforces a hard rule: only SD Gundam-tagged units are allowed, and Squad 1's Slot 1 must be Knight Gundam. There is no way to bypass either restriction, so build around it.
How do I deal with the Swordsman Gelgoog's permanent -4 Movement debuff?
Attack it from range 2. The Swordsman Gelgoog has a deliberate firepower vacuum at exactly range 2, so you can hit it without triggering its counterattack — and you avoid eating the permanent movement penalty entirely.
Do the retainers really revive?
Yes. All three adds (Knight Galbaldy β, Warrior Rick Dom II, Swordsman Gelgoog) recover 50% HP when their HP hits zero, so you need follow-up damage to finish each one. The recommended lineup's Support Attack slots exist precisely for this.
What happens if I cannot finish the stage on turn 1?
At the start of turn 2, reinforcements arrive: 2× Knight Galbaldy β, 2× Warrior Rick Dom II, and 1× Swordsman Gelgoog. Either bring enough burst to one-turn the stage, or use the Nemo "Combo" cheese route to end the fight before the wave becomes a problem.
What is the cheese route?
Use Martial Artist Nemo's MAP weapon "Combo". First, block the lower Warrior Rick Dom II's Support Defense with your Giant Psycho Golem. Then use Support Attack firepower to trigger the left-side Knight Galbaldy β's revive, walk Nemo next to the boss, and finish that Galbaldy β in melee — "Combo" carries the kill into the Musha Ghost. The decisive hit runs about 90% accuracy.
What reward do I get, and who should equip it?
You get the Demon Blade "Dōtanuki", the Musha Ghost's signature weapon. There is no single ideal user yet; the common pick is the Giant Psycho Golem, since its "Trample" attack already deals high damage and the extra weapon adds even more burst coverage.
Do I need premium currency to clear this stage?
The stage itself is clearable with a well-built free lineup — the cheese route even reduces the need for raw stats. But if you are short on SD Gundam-tagged units or want the burst to one-turn it, refilling your Diamonds makes pulling and limit-breaking much faster. You can top up on the Topuplist SD Gundam G Generation ETERNAL page with your bound Bandai Namco ID email, and Diamonds usually arrive within minutes.
Final Thoughts
The Musha Castle hidden stage is a classic SD Gundam Gaiden-style puzzle fight: a nasty boss, three revive-immune-to-killing adds, and one big reward. The clean path is Giant Psycho Golem's "Groundwork" MAP opener, Support Attack cleanup, the range-2 trick against the Swordsman Gelgoog, and a close-range dogpile on the Musha Ghost. The fun path is Nemo's "Combo" cheese, which trades reliability for speed and skips the turn-2 wave entirely.
Either way, the Demon Blade "Dōtanuki" is worth the unlock — and if you find yourself a few units short of the lineup above, a quick Diamonds top-up on the Topuplist SD Gundam G Generation ETERNAL top-up page can close the gap before you step onto the island. For more SD Gundam G Generation ETERNAL news, banners, and guides, keep an eye on the official Bandai Namco site and the Knight Gundam entry on the Gundam Wiki. Good luck, commander — the Musha Ghost is waiting, and it would very much like its blade back.
