


Arknights Endfield North Wuling Exclusion Zone Guide: Blight Miasma, Enemies and Boss Tips
North Wuling is the Version 1.4 ruin map. Here's how Blight Miasma clears, what Blightshades do, and the Alleikhreos Chiliarch stagger-weapon boss loop.
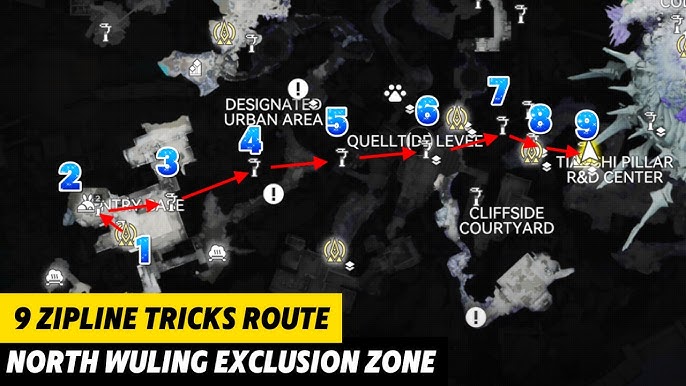
If you have pushed Arknights: Endfield Version 1.4 "Homecoming" to its northern edge, you have hit the game's hardest main-story map: the North Wuling Exclusion Zone. This is not a casual connector like Yinglung Pass — it is the ruined Wuling homeland, consumed by Blight Miasma, crawling with a brand-new enemy family, and guarded by Alleikhreos, Chiliarch, a boss that throws out the usual type-matchup homework and forces you to learn one specific loop. This guide explains how Blight Miasma actually clears, what the Blightshade enemies do (and the one mechanic that will kill you), and exactly how to beat Alleikhreos with the Foundite Weapon stagger loop.
What Is the North Wuling Exclusion Zone? (Version 1.4 New Region)
The North Wuling Exclusion Zone is the second of the two Version 1.4 maps and the deeper, more rewarding half of the Wuling arc's conclusion. According to the official Version 1.4 recap, it is the ruined Wuling homeland now overrun by Blight Miasma, where players must suppress the miasma's sources and clear a safe path for the Wuling people who want to return home.
Lore & Why It's Sealed
The zone's backstory explains both its name and its danger. Ten years before the game's story, the Wuling Very Large Rift (Wuling VLR) — the largest documented Æther rift on Talos-II — ruptured during a Xiranite experiment. The resulting Blight Tide consumed the Wuling Science Station and its prototype facilities entirely. The surviving Tianshi sealed the disaster site, and it has been guarded by the Yinglung Special Task Force (YSTF) ever since. That is why the new enemies here are echoes of the people who died — and why Arcane, captain of the YSTF, takes a central role in the zone's story and joins the Endfield Crisis Team for the boss fight.
How to Unlock (Bravely Breach the Hostile Winds)
North Wuling is not separately gated by Authority Level. It opens permanently at the end of the "Bravely Breach the Hostile Winds" main mission, which you reach after Chapter II Process VII. The quest chains from Yinglung Pass: accept the mission → read Zhuang Fangyi's message → return to OMV Dijang → rest in the Reception Room → the white-dimensional cutscene where Si first appears → reach the Core AIC Area → travel through Yinglung Pass → cross the Underground Canal → activate the Transport Device. The barrier drops and both northern maps stay open for good.
If your roster is thin going into this zone, banking pulls for Arcane (who deals Corrosion and Arts Infliction that reward grouped, debuffed enemies) is often the safer route. The Arknights: Endfield top-up at Topuplist is the official place to stock up, with every pack on the Topuplist storefront.
Blight Miasma — How It Works & How to Clear It
Blight Miasma is the zone's defining hazard. It spreads from the rift's epicenter, periodically surges to the surface as "Blight Tide," and blocks paths until you suppress its sources. The core clearing mechanic is the Blight Core, and there are three ways to deal with it depending on what you can see and reach.
Blight Cores & How to Destroy Them
Per the Blight-clearing guide on Destructoid's Arknights: Endfield help section, most Blight formations carry a Blight Core — a bright red light somewhere inside the mass:
Visible, reachable core: Attack it directly with one of your operators. Do not stand in it — prolonged contact with the core is fatal.
Visible but out of reach: Use Industrial Explosives, a throwable consumable crafted at your base, to blow it up from a distance.
Invisible core: You cannot damage the formation at all until you obtain the Blight Decryption Device from main-story progress, which lets your Scanner reveal hidden cores. Then use any normal method.
Blight Type | How to Clear | Notes |
|---|---|---|
Visible core, reachable | Attack the core directly | Avoid extended contact — it is lethal |
Visible core, out of reach | Throw Industrial Explosives | Crafted at base via Packaging Unit |
Invisible core | Blight Decryption Device + Scanner to reveal, then destroy | Unlocked through main story |
Small rifts (1.4) | Fluid Supply Unit puzzles | New 1.4 mechanic, used in the wild |
Industrial Explosives & the Blight Decryption Device
Industrial Explosives are worth automating early because you will burn through them across the whole zone. The recipe (unlocked via the Basic AIC Plan → Packaging Tech node under Basic AIC II) is:
5× Amethyst Part — made by processing Amethyst Fibers at a Fitting Unit; Amethyst Fibers come from refining Amethyst Ore at a Refining Unit.
1× Aketine Powder — made by processing Aketine plants at a Shredding Unit; found around the Abandoned Trail in Valley Pass, or grown via a Planting Unit / Eco-Farm.
Produced at a Packaging Unit, these let you clear cores you literally cannot walk to. The Blight Decryption Device removes the guesswork on invisible cores: approach any Blight formation, use Scan, and the hidden core lights up.
Fluid Supply Unit Puzzles (New 1.4 Mechanic)
Version 1.4 adds Fluid Supply Unit puzzles that clear the small rifts blocking paths in the wild — distinct from Blight Cores. After a specific AIC upgrade, Fluid Supply Units can even be used without power in the field. In North Wuling, these puzzles double as the environmental gating for several side paths and the route toward the boss arena, so learn the flow-control interaction early.
If you want extra pulls for Arcane or Liino before the boss, the Arknights: Endfield top-up page at Topuplist stocks every pack, and the full catalog is on the official Topuplist site.
Enemies — The Blightshade Family
North Wuling (and Yinglung Pass) introduce the Blightshade, an entirely new enemy family — not reskinned Originium beasts. According to the threat-profile coverage on Endfield Hub's Blightshade bestiary, they are described as "reverberations of the dead" — Æther-replicated shadows that mimic whatever they used to be, manifesting deep in the exclusion zone as rising Very Large Rift activity spreads them into ground you must walk through.
What Blightshades Are & the Energy Mechanic
There are two archetypes:
Corrupted beasts — Tuskbeast, Quillbeast, Rakerbeast.
Corrupted humans — the YSTF line, from Vanguard through Elite up to Captain; some of these shades used to be members of Arcane's own task force.
The mechanic to learn first is Blightshade Energy. When a Blightshade is dissipated, it leaves energy behind. Another Blightshade's attack can arm that energy into a homing bomb that tracks you before it explodes. The fix is simple but easy to forget: dodge on the tell. Don't stand near a freshly-killed shade while others are firing.
Blightshade Threat Tiers
Threat Level | Example Blightshade | Type | What to Expect |
|---|---|---|---|
02 (Common) | Tuskbeast, YSTF Vanguard | Beast / Human | Nuisance-tier; manageable in groups |
03–04 (Advanced/Elite) | YSTF Elite | Human | Tougher, hits harder; prioritize |
05 (Alpha) | Blitzcrash Blightshade | Raised at Tanjian Hall | Heavy hitter; tied to Arcane's story |
UNKNOWN ("Enemy?") | Enigmatic Pale Blightshade | Unknown | Cryptic; Arcane dialogue hints at significance |
The Alpha, Blitzcrash, and the mysterious Enigmatic Pale Blightshade are the standouts — the latter is filed under "Enemy?" with dialogue that clearly threads into Arcane's arc, so expect it to matter more than its stats suggest.
Boss Fight — Alleikhreos, Chiliarch
Alleikhreos, Chiliarch is the Version 1.4 climax boss and the hardest fight in the Wuling arc. Per Endfield Hub's boss combat intel, he is described as "a creation of the Foundation and a veteran of countless battles" — a manufactured, stone-carved war commander. He is also the first (and so far only) member of a new enemy classification: Foundite.
The Core Loop — Stagger Node & Foundite Weapon
The single most important fact: Alleikhreos has no elemental weakness. Community datamining lists him at a flat 1.0× multiplier against all six damage types, so building a team around a "type he's weak to" just narrows your options for zero benefit. This is a mechanics-driven fight, not a type check.
The loop that wins it:
Build his stagger meter through normal damage.
At the Stagger Node, he drops a Foundite Weapon.
Your active operator picks it up and uses it to deal meaningful damage and interrupt his attacks.
Repeat. That stolen weapon is the only efficient damage window in the fight.
The biggest failure mode is ignoring the drop. If you keep attacking with your normal kit and never pick up the Foundite Weapon, you are refusing the fight's only real damage and interrupt tool.
Attack Patterns & Phases
In his healthy phase, Alleikhreos wields a single weapon at a time, and the weapon tells you the attack:
Sword — fast consecutive slashes; dodge on the tell.
Gun — straight-line thrusts; long reach, short wind-up; watch the direction.
Bow — mid-range arrows; predict the movement.
Shield — a ~2.5-second charge into a half-map shockwave. This is interruptible with the Foundite Weapon. Never eat it; pick up the weapon and break the charge.
As his health drops into later phases, he summons clone doubles (first a pair, then more) that mirror his attacks — sword crosses, gun-line thrusts, and clone arrow barrages that compress your dodge space. Don't tunnel-vision the main body; the copies will punish you. In his final phase he leaps into the air, raises a barrier, and rains a clone-assisted barrage ending in a single piercing end-arrow — keep moving the whole time and duck to the edge for the final shot.
Phase | Key Attack | Counter |
|---|---|---|
Healthy (single weapon) | Sword / Gun / Bow / Shield-charge | Dodge per tell; interrupt Shield with Foundite Weapon |
Lower HP (summons) | Clone doubles mimic sword/gun/arrow | Respect added pressure; don't tunnel main body |
Final (barrier) | Barrier End-Arrow + clone barrage | Stay mobile; edge-position for the last shot |
Team & Prep Tips
Bring healing items. The fight is long and the phases are punishing; recovery consumables are standard prep for Wuling-era bosses.
Know your Xiranite Support jump. Like other Wuling bosses, mobility tricks (high jump / dive) help you dodge telegraphed AoEs and reposition during summons.
Slot Arcane if you have her. Her Corrosion INT mode and Arts Infliction WILL-mode both reward the grouped, debuffed enemies Alleikhreos surrounds himself with.
Be mindful of who holds the weapon. The Foundite Weapon is used by your active operator, so control the right unit when the Stagger Node triggers.
Don't read 100 DEF as "easy." His armor is low, but your damage is gated by the stagger loop, not by raw stats — the loop is the fight.
The Arknights: Endfield recharge option at Topuplist is the official top-up if you need to round out a boss-ready roster, with all bundles listed on Topuplist.
Farming & Why Push North Wuling
Beyond the story payoff, North Wuling is the chest mine of Version 1.4. Per Game8 map data summarized in the BlueStacks region guide, the zone holds:
28 Aurylenes
85 Treasure Chests
4 Protocol Dataloggers (fund your AIC Index for the new gas tech)
1 Rare Ore spot
After you clear the main mission, the boss becomes farmable in RE-Crisis mode (the recurring crisis stage), so the Alleikhreos fight is also a repeatable reward source — worth building the stagger-weapon loop until it's muscle memory. Combined with Yinglung Pass's 2 Gear Template Crates, the two northern maps are where you secure the Tier 5 gear and AIC upgrades that define endgame Wuling builds.
Common Mistakes
Chasing an elemental advantage on Alleikhreos. There isn't one. Build for the stagger loop instead.
Ignoring the Foundite Weapon drop. The single biggest clear-killer. Pick it up every Stagger Node.
Standing near dissipated Blightshades. Their leftover energy arms into a homing bomb — dodge on the tell.
Forgetting Industrial Explosives. Out-of-reach cores block progress; automate their production.
Skipping the Blight Decryption Device scan. Invisible cores stay unkillable until you scan them.
Tunnel-visioning the boss body during summons. The clone doubles do the real damage in later phases.
Final Verdict
The North Wuling Exclusion Zone is the Version 1.4 endgame test: clear Blight Miasma with cores, explosives, and Fluid Supply Units; respect the Blightshade Energy mechanic; and beat Alleikhreos by committing to the Foundite Weapon stagger loop rather than any element. Push the main mission to open it, farm its 85 chests and 28 Aurylenes, and run RE-Crisis until the boss is routine. Do that, and the ruined homeland — and its loot — is yours.
FAQ
Q1: How do I unlock the North Wuling Exclusion Zone?
Progress Chapter 2 to the "Bravely Breach the Hostile Winds" mission (after Chapter II Process VII). Clearing that quest opens both Yinglung Pass and North Wuling permanently — there is no separate Authority Level gate for this zone.
Q2: How does Blight Miasma clear in North Wuling?
Blight formations have Blight Cores. Attack a visible reachable core directly, throw Industrial Explosives at out-of-reach cores, and use the Blight Decryption Device + Scanner to reveal and destroy invisible cores. The new 1.4 Fluid Supply Unit puzzles clear the small rifts blocking paths.
Q3: What are Blightshades and what is their dangerous mechanic?
Blightshades are "reverberations of the dead" — Æther-replicated shadows of beasts and fallen YSTF soldiers. The key threat is Blightshade Energy: a dissipated shade leaves energy that another shade's attack can arm into a homing bomb. Dodge on the tell and don't linger near killed shades.
Q4: Does Alleikhreos, Chiliarch have an elemental weakness?
No. He sits at a flat 1.0× multiplier against all six damage types, so the fight is mechanics-driven. The win condition is the stagger loop: build his stagger meter, grab the dropped Foundite Weapon at the Stagger Node, and use it to damage and interrupt him.
Q5: How do I interrupt Alleikhreos's big attacks?
His shield-charge (a ~2.5s wind-up into a half-map shockwave) and several later charge attacks are interruptible with the Foundite Weapon. Pick it up with your active operator the moment the Stagger Node triggers and break the charge.
Q6: Where can I safely top up for a boss-ready roster?
For the official, secure top-up, use the Arknights: Endfield top-up at Topuplist, with the full pack catalog on the Topuplist storefront.
